Blogger is a great platform, though it is a little behind in the plugins department.
Here we are talking about to make sidebar widget fixed in blogger while scrolling the page.
It looks quite cool if a user scrolls a page and a sticky widget in the sidebar goes down till the post ending.
It’s quite obvious, it can have a higher click through rate(CTR) as well. Because it can grab the attention of the reader entirely.
If you have something important to show to the readers, you can display in the blogger sidebar widgets.
Saying important it could be any kind of updates which you think your visitor should know.
For Instance – Exclusive Deals, Updates, Popular Posts, Sign Up forms, sticky social bar. I have seen in some blogs even they placed Advertisements as well. Even that is quite sensible.
So here we are going to create a sticky widget with minimum effort and less amount of code as well.
Also Read: How to Add Contact Form In Blogger
Make sidebar Widget Fixed In Blogger
Let us move forward, and get into action.
#1. Create a Widget/Gadget
Step 1. Login to your Blogger account
Step 2. Navigate towards the Layout and click on it.

Step 3. Now we are supposed to add a widget, so click on Add a Gadget.
Step 4. A pop-up window will appear with a lot of gadgets in option.

Step 5. Find “HTML/JavaScript,” and click the (+) icon shown in the above image.
Now here we are about to add our own code in the box. You can find the code below.
#2. Add code in the HTML/JavaScript box to make a floating sidebar widget
Now copy the below code into that, but don’t save it now
<script>
//<![CDATA[
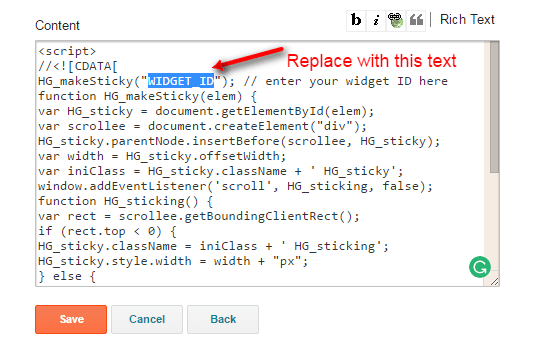
HG_makeSticky(“WIDGET_ID”); // enter your widget ID here
function HG_makeSticky(elem) {
var HG_sticky = document.getElementById(elem);
var scrollee = document.createElement(“div”);
HG_sticky.parentNode.insertBefore(scrollee, HG_sticky);
var width = HG_sticky.offsetWidth;
var iniClass = HG_sticky.className + ‘ HG_sticky’;
window.addEventListener(‘scroll’, HG_sticking, false);
function HG_sticking() {
var rect = scrollee.getBoundingClientRect();
if (rect.top < 0) {
HG_sticky.className = iniClass + ‘ HG_sticking’;
HG_sticky.style.width = width + “px”;
} else {
HG_sticky.className = iniClass;
}
}
}
//]]>
</script>
<style>
.HG_sticking {background:#ffffff !important; position:fixed !important; top:0; z-index:9999; box-shadow:0px 10px 4px -5px rgba(0,0,0,0.3); margin-top: 0; position:relative9 !important;}
</style>#2. Replace Widget ID HTML/JavaScript box.
Step 1. Go back to the blogger layout, and click on “Edit” of that particular widget, which you want to make sticky in the sidebar.
Step 2. Once you click on edit button you would be able to see a “Widget ID” in the top bar of it. See the below image for better insights.

Step 3. Copy that Widget ID and replace it with the source code.
Step 4. Once the actual widget ID got replaced, Hit the save Button.
Step 5. And also Click on Save Arrangement in the Blogger Layout.
There you go, you are done and your widget will be sticky in the sidebar.
In fact, not only at the sidebar you can make the widget sticky anywhere you would like to, following the same process.
By simply copying the Widget ID and replace the same in the code as well.
Do let us know if you faced any issue creating a sticky widget in the comment section below, we would be happy to help you out in this.
Also Read: How to Backup and Restore Blogger Template

Hi Navin,
I got to #2 Step 2 of your solution, however when I click on “Edit” of the widget I want to make sticky (i.e. the “Blog Search” widget, no code appears anywhere on my screen that identifiies the widget ID ?
There doesn’t appear to a “top bar” anywhere on my screen that gives you the code with the widget ID showing ?
All I get is a plain box with a couple of editing options presented. e.g. “Configure search box” and a space to add a title.
Any ideas ?
Cheers
Where do I find the Widget ID ?
Thanks for this useful and helpful blogging trick. Do you have a post on how to add horizontal menu to blogger header? I have tried but my pages still appear as list and not horizontal. I will so much appreciate if someone can help me out.
This is a really good tip especially to those
fresh to the blogosphere. Brief but very precise info…
Thanks for sharing this one. A must read post!
Not worked for me. Why???? Can you suggest me some other codes???
Hello, Ravinder I have tried it on demo site and the code above still works great. I guess you are missing out something, please go through again and follow the exact steps.
wow, it works.
thanks for sharing this wonderful article. Am on blogger and this post is really helpful
Glad to know you are Blogging on Blogspot and this post did helped you. Keep Visiting!
Hi, thank you for the code. Yet I wish the code may work better at mobile … since the code don’t allow me the scroll down to footer.
it worked!
Hi, I am thankful to you for sharing this awesome article with this helpful knowledge. this is the blog that provide the lots of good information thanks for provide such a good information.
It’s good to know Niraj, it helped you.